
2.1 RESEPI Requirements
-
Since the GUI is a web-based interface, it only requires a device with Wi-Fi connectivity capabilities and a web-browser (PC, laptop, tablet, smartphone). The GUI has been configured to work with the latest versions of common web browsers such as: Google Chrome, Mozilla Firefox, Safari, Microsoft Edge and Internet Explorer.
-
When planning your mission flight, ensure to follow the appropriate convergence maneuvers as outlines in the RESEPI Standard Operating Procedures Manual.
-
To store flight data, the LiDAR payload must have the Samsung BAR Plus 256 GB – 400 MB/s USB Flash Drive Champagne Silver (MUF-256BE3/AM) connected to the USB port. This storage drive has been tested and verified to have sufficient read/write speeds required for reliability and ensuring data integrity while using RESEPI.
-
For users that would like to utilize RTCM (via RTK workflow) corrections services in real-time, a wireless modem is required to be inserted into one of the unit’s USB ports to receive RTCM Corrections. This is only available for specifically configured hardware. For more information on the recommended modem, refer to Section 2.3.1.
Interface summary: The web-based GUI allows the user to control and monitor recording data for point cloud generation. Settings defined up-front during the setup process will ensure users can take advantage of one-click workflows when post-processing data later. The interface additionally allows the user to configure settings for data recording and service components inside the payload.
2.2. Base-station
A base station is a stationary receiver (usually with a known location) which is used in post-processing for measuring GNSS errors and correcting rover data gathered in the field.
2.2.1. Base-station Setup Location
The base station needs to have a clear sky view 30 degrees above the horizon. There should be no obstacles that could block the view like buildings, trees, cars, humans, laptops, etc.
If using a public base station service, ensure that the base station to be used for processing is no greater than 40 kilometers away from the location of the flight, or the user will notice data quality loss. The distance between your base station and payload should be kept at a minimum without moving the base station during recording for the best data results possible.
Take a look at the 2 pictures below in Figure 1. The left picture demonstrates desirable conditions for the base location. The right one is an example of bad surrounding conditions such as the reduced view of the sky, possible obstructions, or vegetation nearby.
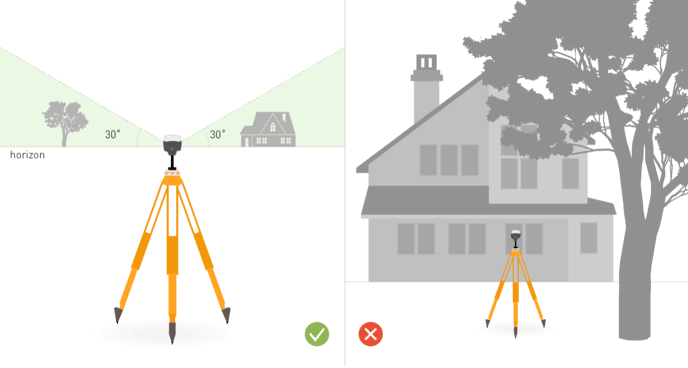
Figure 1: Example base station setups
For more in-depth information on placing your base-station and finding your base-station's location, please refer, as an example, to Emlid's documentation here:
https://docs.emlid.com/reachrs2/tutorials/basics/placing-the-base
2.2.2. Base-station Recording Formats
Most base-stations can record in multiple different formats, for a comprehensive list of formats that PCMasterPro accepts, please refer to the RESEPI PCMasterPro User Manual.
For ease of use, use RTCM3 or RINEX file formats.
2.3. Understanding the LiDAR Payload
Inertial Labs supplies many payloads with custom, expanded hardware configurations, but in general, the LiDAR payload is comprised of a high-grade Inertial Navigation System (INS), an internal computer, and a datalogger. In its simplest configuration, it has 2 USB ports (some units that possess a camera have only one, as the second is used internally to connect to the camera). It also has a primary (PRI) and secondary (SEC, not available on some) antenna port used to connect the payload to GNSS antenna(s) and supported interfacing devices (USB 2.0-based). The LiDAR payload can be integrated, in-house, with a variety of LiDAR scanners including units from Livox, Hesai, Velodyne, Ouster, Quanergy, and Teledyne.
The power button (shown in Figure 2) is utilized for various functions listed below.
-
Power On – To power up the unit, simply apply power to the system (using cable supplied, or directly from drone) then tap the power button and wait until the 3 lights begin to glow. After a few moments, you will hear various sensors power on and begin to initialize.
-
Start Data Logging – After powered, and various systems have booted up (you should have already heard the camera click twice, if applicable, and the LiDAR will be spinning) tap the power button to begin logging data. The boot light will begin to flash between red and green, which indicates that the payload is beginning to log data.
-
Terminate Data Logging – To stop logging data, tap the power button again, which will make the boot light stop flashing.
-
Power Off – Shutting down the payload requires the user to hold the power button for about 4 seconds, after this let go and after a few seconds the 3 lights will turn off indicating that the payload has shut down. To perform a forced shutdown (not recommended), hold the power button for about 10 seconds and the lights will turn off.
IMPORTANT NOTE: For many variants of the RESEPI payload, the drone will supply power to the payload, so it is important that the drone is powered on before the unit. With that relationship in mind, make sure to stop recording and then shut down the unit before the drone. Before shutting off the drone, the BOOT light on the payload must stop flashing. This is critical to ensure data integrity. If not followed, then data may be corrupted.
2.3.1. RTK Corrections
For users that would like to utilize in-flight RTK corrections (as RTCM input into the payload's navigation filter), the approved and suggested wireless modem is the ZTE MF833V – Amazon.com: ZTE MF833V USB Dongle Adapter 150 Mbps Wireless Modem Mobile Broadband 4G LTE Stick: Electronics. This modem is to be connected to the USB port in addition to the provided Samsung USB drive that is used for data recording. As previously mentioned, this may not be a compatible addition to your payload's hardware depending on how many available USB ports your system has.
For clarification on if your system can support this additional hardware, please contact support@inertiallabs.com and provide your unit’s serial number. A technical support agent will follow up with desired information. If the unit does not have enough functional USB ports for RTK, in this case a standard USB Hub can be used. The user can also contact customer support to request modifications to their unit to enable more USB ports to be accessible externally.
For a more detailed step-by-step process on completing an RTK dataset, please refer to the RESEPI Standard Operating Procedures Manual.
To connect your payload to a base station to receive RTCM traffic for corrections, navigate the “RTCM Corrections” section within the web-GUI under Settings>Connectivity. Refer to the information within RTCM Corrections Window under Section 4.3.2 for more information. Additionally, refer to your base station’s user manuals and documentation for the information required to enable communications between the base station and the RESEPI. When the user is finished entering the information, select “Save” at the bottom of the page.
If you do not see your base station’s information shown, the connection was not successful and the unit is not receiving RTCM corrections. This will result in poor RTK results if it is not fixed prior to starting data acquisition on your LiDAR payload. Verify that the information entered is correct for your base station (Ex: the correct connection type was selected, no typos in any fields, etc.). If the information is verified to be correct, retry typing in the information into the RTCM Corrections window until base station information is shown on the main Status window.
Before beginning data capture, ensure that the GNSS Solution type in the Status window is sufficient for RTK. It is recommended that the user has a GNSS Solution of “Computed, Narrow Integer” for the best data quality. For RTCM Corrections, the user must have a minimum GNSS Solution of “Computed, Narrow Float”. These are all indicative that Differential GNSS (DGNSS) augmentation is being performed. To obtain the best accuracy from RTK, the carrier phase ambiguities should be fixed to integer numbers. The GNSS Solution types will appear in the order below as a fix becomes established. However, it may skip straight to “Computed, Narrow Integer” and bypass some lower solution types.
Order of GNSS Solution Messages (Lowest to Highest):
-
Insufficient observations, other (unable to record)
-
Computed, Narrow Float
-
Computed, Narrow Integer
In addition, make sure to enter an estimation of your unit’s IMU to Antenna offsets prior to beginning data capture. The more accurate this measurement is, the better the final RTK data will be. For more information on this, refer to Section 4.3.1.
When the payload is successfully receiving RTCM traffic from the base station and can perform RTK corrections, the boot light on the payload will blink 3 times incrementally (solid green with 3 red flashes) when the user initially begins their data recording.